Hello! We’ve noticed that you haven’t made any recent edits on your wiki this year. This is a notice that your wiki is eligible for removal. Click here to learn more about the criteria for wiki removal.
*If you have any questions or are unclear about anything at any time, ask someone! Daniel is likely the world's foremost expert in yeast dissection.
*If you have any questions or are unclear about anything at any time, ask someone! Daniel is likely the world's foremost expert in yeast dissection.
−
*Watch the [http://www.jove.com/video/1209/measuring-replicative-life-span-in-the-budding-yeast?ID=1209 video of RLS dissection at Jove]
+
*Watch the [http://www.jove.com/video/1209/measuring-replicative-life-span-in-the-budding-yeast?ID=1209 video of RLS dissection at Jove] ([http://goo.gl/y6lb4e youtube link])
*Pouring plates, pulling strains, and prepatching click -> [[setup for RLS]]
*Pouring plates, pulling strains, and prepatching click -> [[setup for RLS]]
*Setup of RLS plates
*Setup of RLS plates
Revision as of 18:53, 7 July 2016
If you have any questions or are unclear about anything at any time, ask someone! Daniel is likely the world's foremost expert in yeast dissection.
Pouring plates, pulling strains, and prepatching click -> setup for RLS
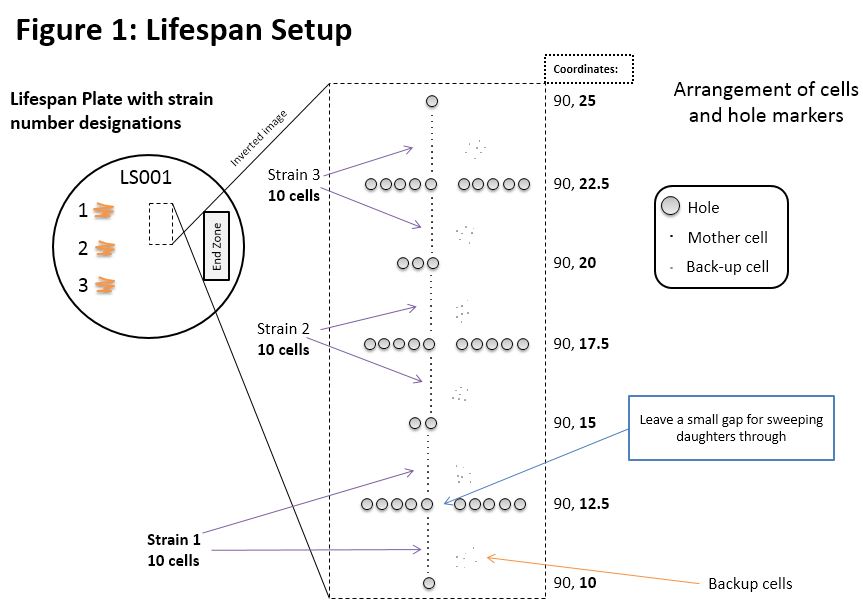
Setup of RLS plates
Place the plate on the microdissection scope, mark the bottom of the plate with a marker
start at 90,10 punch one hole, see Figure 1 for an illustration of holes
Pull cells from first strain (top of the plate) and place cells from 90,10 to 90,15. place 10 cells vertically. Also put out some indiivual backup cells (not clumps of cells)
Make sure cells from the correct strain are placed in the correct area! This is incredibly important!
Put your initials on the plate
making data entry sheets:
' *THIS SECTION IS INCOMPLETE* 'how to copy template, etc
Picking Daughter
i. Incubate set up plates at 30 degrees C. for 2 hours
ii. Pick a daughter from ANY cell in a strain and line up 20 new daughters, replacing the old mothers
iii. If daughter cells were successfully picked, mark “n” in the spreadsheet
If unable to select a daughter, leave original mother to the left of the “n”s and mark “A” in the spreadsheet
Group “A”s together at the end for easy recognition
Discard old mothers
Leave appropriate number of INDIVIDUAL back-up cells
Completely dissect and clean up one strain at a time
“A” cells will be replaced during next round of dissection.
Incubation times
New lifespans will be incubated for 2 hours. After the majority of cells are no longer dividing enough at 2hrs, then the time can be increased to 3 hours. Similarly, eventually the incubation time can be increased to 4 hours. Let all lifespans get incubated at 30C for at least 4 hours each day (i.e., count 2hr lifespans at least twice). After the days incubation move plates to 4°C for overnight storage. If you can let older lifespans get some incubation time before storing them at 4C. At the end of the day, double check to make sure no lifespans have been left in the 30C incubator!
Micomanipulation - Dissecting cells
Number 1 rule - Don't break the needle!
Punch holes far away from all cells to make sure the needle is free of cells
You will acquire hands on training on how to dissect yeast cells (typically at least 10 hours of training is required).
Entering data
MAKE SURE YOU ARE IN THE RIGHT RLS # FOLDER and not just the last folder open on the computer.
For any duration incubated lifespan, only 1 cell (just the mother present) = 0
For any duration incubated lifespan, 2 total cells (mother plus one daughter removed), = 1 division
For a lifespan incubated 2 hr, 2-5 = 2 divisions; ≥6 cells = 3 divisions of the mother; ≥15 = 4
For a lifespan incubated 3 hr, ≥8 cells = 3 divisions of the mother; ≥20 = 4
For a lifespan incubated 4 hr, ≥10 cells = 3 divisions of the mother; ≥25 = 4
note it is best NOT to overincubate lifespan, ideally dissect and get primarily 1's & low 2's.
If a 2 hour lifespan is over incubated for 3 hours (or any other overincubation) count as if the lifespan as you would normally
For the most accurate counting, ideally lifespans will be incubated to count 1's and low 2's. For precision, make sure we all count using the above counting scheme!
put your initials after the last data entered at the bottom of the excel file
Sometimes there will be a "ghost" cell, and it may just be hard to see but not lost. If a cell is missing, first determine exactly which cell is missing. Sometimes there will be a gap where the cell used to be, or sometimes you can see the spot on the plate where the needle has created an indentation where the cell once was. On the excel sheet, write "LOST" (without quotation marks) instead of the cell division number for that round. Punch a hole in the place where the cell was to indicate it was lost. From then on, when encountering this spot on the excel sheet when counting, simply skip over it.
Colonies or contamination on plate
Note the contamination in the "Contamination tab"
Make note of the contamination in the comments section at the top of the LS spreadsheet if a warning for others not to touch the contamination is necessary.
If the contamination is on top of some mother cells. Count those cells as LOST and for mothers near contamination, move the remaining mothers to another location far enough from the contamination so that the contamination will not again grow into the mothers (about 5 degrees distance away). Make an arrow and a line with holes to help guide the next dissectors to where the mothers were moved. Cut out contamination if safe and possible.
If the contamination is far enough from mothers: (use your judgement, and remember that contamination can spread). Depending on the position, possibly remove the contamination using sterile technique (only do this if you have been trained, or ideally you will give the plate to Daniel or someone experienced to remove the contamination)
Pink bacterial contamination: It is usually on the edge of the plate. Due to this it can get on the plate holder on the microscope and spread to other plates.
It is YOUR responsibility to look at plates and notice contamination!
The scope closest to the door is for plates with visible bacteria. Contaminated plates must be dissected on that scope.
Dissect cleanest plates to worst contaminated plates, in that order on that scope.
Ethanol plate holder very well with kimwipes after those plates. Raise the needle to prevent damage to it. DO NOT BREAK NEEDLE!
Bacteria should be carefully cut out when possible and placed in bio-hazard bags.
"Clusters"
If a cell has more than one cell attached and you are unable to remove those cells, then it is a 0, even if other cells were removed.
Scoring strains as DEAD
If an entire strain (all 20 cells in a set) has not divided for 8 hours straight (e.g., 2 rounds of 0 in a lifespan that is given 4 hours incubation), then mark the strain as dead by placing "x" (without quotes) where you would normally put the division count. Also use a marker to put an X on the strain number on the the plate.
End of life analysis
In the next column after the "x" put the end of life indicator put:
u=unbudded or just the mother cell;
s=small bud 50% the size or less of the mother;
l=large bud greater than 50% the size of the mother;
c=cluster of cells (more cells than just mother+bud)
Killing plates
once an entire plate is dead, move the excel sheet containing those strains into the folder labeled dead. That's it.
To kill a lifespan, move the last excel sheet into the dead folder, erase the lifespan number from the board
Optical Issues
Sometimes a fingerprint or scratch on the plastic surface of the petri plate can distort the image. Keep the plate clean and do NOT scratch the plate by over focusing with the lenses.
Keep the oculars and objective lenses clean and free of dust and fibers as well as the diaphragm and light source below.
